A project's cut and fill quantities can be imported from a station-specific bill of materials in Excel format (*.xlsx). It is possible to import multiple Excel file sheets into a project where MAGNET Project autodetects column and row settings from basic formats.
Disposal areas, borrow pits, and crushing plants are added manually. Drainage and other quantities can also be added with the bill of materials. It is possible to add or edit any quantities later on.
In the video, you will see an example of what a bill of materials for an area and linear main road line looks like. The area is a point-like location that is not station specific.
A bill of quantities for an alignment includes the following information:
- Column A contains the road line station and its ascending numbering.
- Columns B and beyond contain the masses of the road line quantities.
For MAGNET Project to import the masses correctly, the following requirements must be met:
- The first column must be labeled Station. (MAGNET Project begins importing from that point onward.)
- The Station numbering needs to be ascending, but the intervals do not necessarily need to be of the same length.
- The names of the quantity types (e.g., Cut/Fill or Noisebank) and their units don't need to be identical with the quantity types defined in the MAGNET Project template or project file, but this would make the process of importing faster. If quantity type names don't match, the user can map quantity type names manually in the Import dialog box.
- The quantities are formatted as numbers, not as text.
- There are no summary rows below the quantity table.
Steps for importing a bill of quantities
- Start the import by creating a new project from template (File > New from Template), and import a bill of quantities by navigating to File > Import. In this example, we are using the default template.
- Select the correct file (bill of quantities) from your computer, and click Open.
- Make sure the settings for your sheet are correct, and connect your bill of quantities to the correct location, if you already have locations set up in your project. Click Next.
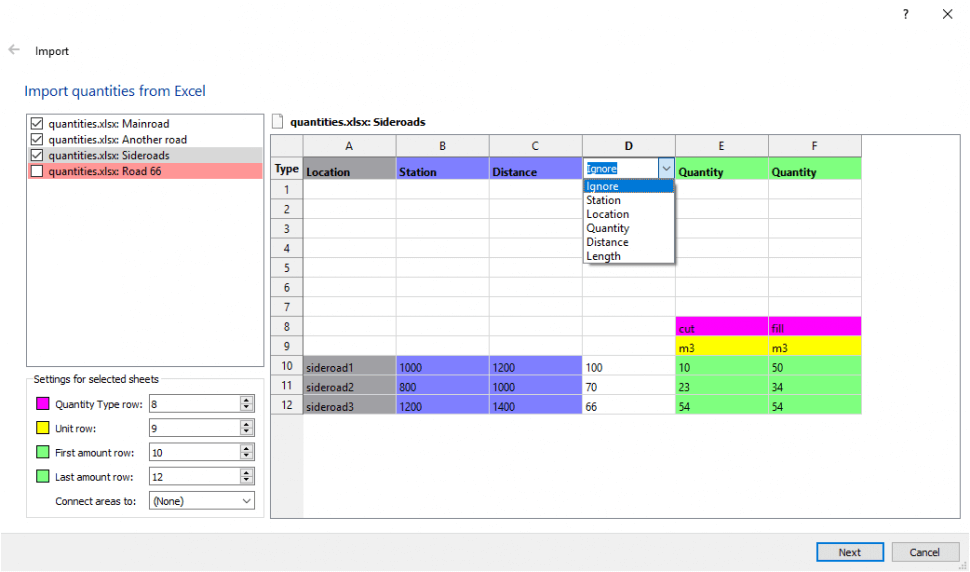
At the first page of the import dialog box, you can see the following:
-
A list of all imported sheets
- Select a sheet from the list in the upper left to see its contents and settings.
- Deselect sheets that don't contain quantities in case the "One of the selected sheets has problems" notification appears during the import process.

Color-coded row settings in the bottom left include the following:
- Quantity Type row: A row where quantity type names are located
- Unit row: A row where unit names are located. Set to 0 (= unset) if there are no units in the sheet.
- First amount row
- Last amount row
Column types can be edited using the drop-down list by selecting a cell in the top row. Possible column types include the following:
- Ignore: The column is ignored.
- Station: Station of quantity (there can also be two station columns).
- Location: Different locations can optionally be defined for each row.
- Quantity: The column contains the quantity type name and the quantity data (numbers).
- Distance: Distance defines the length of the intersection created to the default location.
- Length: If there is a location column, instead of station columns, you can have a length column.
After editing (if needed), click Next.
- In the second page of the import, if you don't wish to import some of the data, select Don't import from the drop-down menu. Match quantity types with correct quantity types if needed. The names of the quantity types in Excel don’t necessarily need to be identical to the ones in the project file because of the possibility of manually editing in the mapping page in a previous import dialog box.
If you are importing actual quantities, select the check box for Import quantities as actuals.
Each item imported from Excel can be mapped to
- Some existing project item
- <Add>: New item is added to the project
- <Don't import>: Item is not imported
After making your selections, click Import.
- Open the Mass Haul View to view imported quantities. Cuts are shown above the line, and fills are below the line.